How to use MyGeotab for dispatch
MyGeotab offers an intuitive way to dispatch fleets to specific locations with the help of zones, and by integrating with third party routing devices.
By Geotab Team
Dec 7, 2021

MyGeotab offers an intuitive way to dispatch fleets to specific locations with the help of zones, and by integrating with third party routing devices, such as Garmin. Zones, as defined in MyGeotab, are geofences that represent a virtual perimeter or fence around a geographical real-world area of interest. Dispatching in MyGeotab works by obtaining the addresses of zones, and then by sending the addresses to the third party routing device. There are two main ways of dispatching with MyGeotab: dispatching vehicles to zones and dispatching routes to vehicles.
Dispatching Vehicles to Zones
Before you can begin to dispatch vehicles to zones, you will first need to add some zones into your MyGeotab database. MyGeotab offers simple tools for zone creation which allows you to easily draw a zone shape in an area of the your choice. In addition, a large number of zones can be created by importing a bulk list of latitude and longitude information prepared in an Excel spreadsheet. Once the zones have been imported into the database, you can then start dispatching to vehicles by finding the zone on the map and clicking on it. Clicking on the zone opens a list of options which includes one that is called Dispatch Vehicle Here.

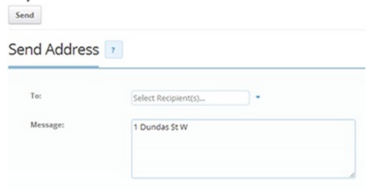
When clicking on the dispatch button, you can select one or more vehicles to receive the request. Additionally, a message can be sent along with the dispatch address which can provide additional instructions for the driver. Once the dispatch message is sent, the routing device receives the address and begins routing to the destination once the driver reads the message and chooses to accept the dispatch instructions.
Dispatching Routes to Vehicles
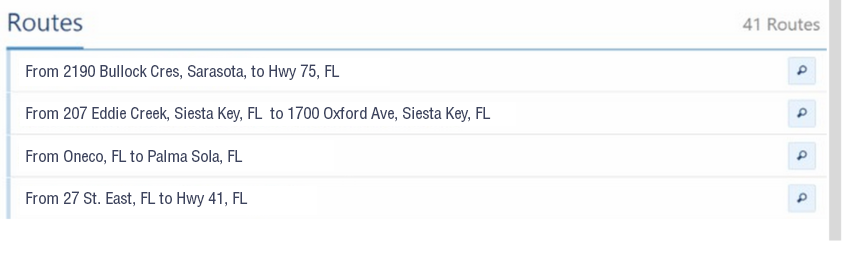
Entire routes can be sent to vehicles to dispatch a sequence of destinations that the driver should reach. Routes in MyGeotab can be created by connecting a sequence of zones together. To send a route to a vehicle, select Zones & Messages from the MyGeotab main menu and then select Routes from the sub-menu. Find the desired route from the available list of routes, and then there will be an option to send the route to the vehicle.
MyGeotab has made dispatching easy. It’s a powerful fleet management tool that allows you to create custom zones, helping you enhance your fleet efficiency and overall customer service. You’ll have better insight to where your fleet is, and where your drivers are going. In turn, you’ll be able to see opportunities for fitting in more customer visits, while reducing the number of miles driven. For more details about zone creation and dispatching, please refer to Geotab’s Product Guide.
To learn more about Geotab's routing and dispatching solutions, click here.
Subscribe to get industry tips and insights
The Geotab Team write about company news.
Table of Contents
Subscribe to get industry tips and insights
Related posts

Building a proactive government fleet safety program with data and AI
March 9, 2026
5 minute read
Telematics trends for 2026: What is changing and how fleets can respond
January 30, 2026
6 minute read
Fleet GPS tracking systems cost: Full price breakdown and ways to boost ROI
January 30, 2026
6 minute read


Fleet operations: Key components, benefits and challenges
January 7, 2026
4 minute read
.jpg)
10 best fleet management software to boost performance and cut costs
December 22, 2025
8 minute read